<?xml version="1.0" encoding="utf-8"?><feed xmlns="http://www.w3.org/2005/Atom" ><generator uri="https://jekyllrb.com/" version="3.10.0">Jekyll</generator><link href="https://roberto-chang-silva.github.io/feed.xml" rel="self" type="application/atom+xml" /><link href="https://roberto-chang-silva.github.io/" rel="alternate" type="text/html" /><updated>2026-08-31T16:05:50+00:00</updated><id>https://roberto-chang-silva.github.io/feed.xml</id><title type="html">Roberto Chang-Silva</title><subtitle>Academic portfolio, blog and research profile of Roberto Chang-Silva.</subtitle><author><name>Roberto Chang-Silva</name><email>rjavierch@seoultech.ac.kr</email><uri>https://air.seoultech.ac.kr/index.do</uri></author><entry><title type="html">Fixing Invalid Format SSH Key Errors in ChromeOS Secure Shell</title><link href="https://roberto-chang-silva.github.io/posts/fixing-invalid-format-ssh-key-errors-chromeos" rel="alternate" type="text/html" title="Fixing Invalid Format SSH Key Errors in ChromeOS Secure Shell" /><published>2026-08-31T00:00:00+00:00</published><updated>2026-08-31T00:00:00+00:00</updated><id>https://roberto-chang-silva.github.io/posts/fixing-invalid-format-ssh-key-errors-chromeos</id><content type="html" xml:base="https://roberto-chang-silva.github.io/posts/fixing-invalid-format-ssh-key-errors-chromeos"><![CDATA[<p>I needed a lightweight way to SSH into my remote home server from my recently new (very, but very old, haha) Chromebook without burning through the battery. Spawning Crostini just to keep a terminal open runs a full Debian VM in the background, which drains the battery fast. Termius on Android is lighter, but the native ChromeOS Secure Shell app is just the most (I think) power-efficient option. The problem started when I tried importing my existing SSH key pair into the native app’s Identity dropdown and got slapped with a vague “invalid format” error every time I tried to connect.</p>

<h1 id="what-caused-the-error">What caused the error?</h1>

<p>The ChromeOS Secure Shell app runs inside an isolated browser runtime (Native Client/WebAssembly), which makes its file parser far more strict than standard OpenSSH on Linux. It turns out two separate issues can trigger this exact error when importing a key.</p>

<h1 id="how-to-fix-it">How to fix it</h1>

<p>First, the ChromeOS parser requires a strict trailing newline character (<code class="language-plaintext highlighter-rouge">\n</code>) at the very end of the private key file. If your key ends immediately after —–END OPENSSH PRIVATE KEY—– without a final blank line, the parser fails to detect the end tag. Just add an extra line at the end of the key-files, that’s all!</p>]]></content><author><name>Roberto Chang-Silva</name><email>rjavierch@seoultech.ac.kr</email><uri>https://air.seoultech.ac.kr/index.do</uri></author><category term="homelab-systems" /><category term="chromeos" /><category term="ssh" /><category term="linux" /><category term="workflows-code" /><summary type="html"><![CDATA[Fixed an invalid format error when importing SSH keys into ChromeOS Secure Shell by addressing missing newline characters and cipher issues.]]></summary></entry><entry><title type="html">Serving a Localhost-Only Port Through Tailscale via an SSH Tunnel</title><link href="https://roberto-chang-silva.github.io/posts/tailscale-serve-ssh-tunnel-localhost-port" rel="alternate" type="text/html" title="Serving a Localhost-Only Port Through Tailscale via an SSH Tunnel" /><published>2026-08-31T00:00:00+00:00</published><updated>2026-08-31T00:00:00+00:00</updated><id>https://roberto-chang-silva.github.io/posts/tailscale-serve-ssh-tunnel-localhost-port</id><content type="html" xml:base="https://roberto-chang-silva.github.io/posts/tailscale-serve-ssh-tunnel-localhost-port"><![CDATA[<p>Following up on the SSH-over-Tailscale-Serve setup from last time: I ran into a case where the service I wanted to reach wasn’t bound to the server’s LAN interface at all, just to <code class="language-plaintext highlighter-rouge">localhost</code> on the box itself. That’s why my normal SSH command included <code class="language-plaintext highlighter-rouge">-L 8080:localhost:8080</code>, I was already tunneling into loopback because nothing outside that machine could see the port directly. Which meant <code class="language-plaintext highlighter-rouge">tailscale serve --tcp=8080 tcp://192.168.1.50:8080</code> wasn’t going to work; the workstation had no way to reach a port that only exists on the server’s own loopback.</p>

<h1 id="the-problem">The problem</h1>

<p>Two ways a service on a remote box can be listening:</p>

<ul>
  <li>
    <p>Bound to <code class="language-plaintext highlighter-rouge">0.0.0.0</code> or the LAN IP: reachable from anywhere on that network, including my Tailscale workstation.</p>
  </li>
  <li>
    <p>Bound to <code class="language-plaintext highlighter-rouge">127.0.0.1</code>: only reachable from that machine itself, hence the SSH <code class="language-plaintext highlighter-rouge">-L</code> forward in the first place.</p>
  </li>
</ul>

<p>Mine was the second case. So instead of pointing Tailscale Serve at the server directly, I needed the workstation to run its own tunnel into that loopback port, then serve <em>that</em> local copy.</p>

<h1 id="how-to-do-it">How to do it</h1>

<p><strong>Step 1:</strong> On the workstation (not my laptop), open a tunnel to the server’s loopback port.</p>

<div class="language-bash highlighter-rouge"><div class="highlight"><pre class="highlight"><code>ssh <span class="nt">-N</span> <span class="nt">-L</span> 8080:localhost:8080 user@192.168.1.50 <span class="nt">-p</span> 22
</code></pre></div></div>

<p><strong>Step 2:</strong> Still on the workstation, point Tailscale Serve at the tunnel’s local end instead of the server’s IP.</p>

<div class="language-bash highlighter-rouge"><div class="highlight"><pre class="highlight"><code><span class="nb">sudo </span>tailscale serve <span class="nt">--service</span><span class="o">=</span>svc:remote-webapp <span class="nt">--tcp</span><span class="o">=</span>8080 tcp://localhost:8080
</code></pre></div></div>

<p><strong>Step 3:</strong> Confirm the port shows up as forwarded.</p>

<div class="language-bash highlighter-rouge"><div class="highlight"><pre class="highlight"><code>tailscale serve status
</code></pre></div></div>

<p>Now the chain is: tailnet device to <code class="language-plaintext highlighter-rouge">remote-webapp.your-tailnet.ts.net:8080</code>, which hits the workstation’s tailnet interface, which hits its own <code class="language-plaintext highlighter-rouge">localhost:8080</code>, which is the live end of an SSH tunnel into the server’s loopback service.</p>

<h1 id="making-the-tunnel-survive-reboots">Making the tunnel survive reboots</h1>

<p>Running that <code class="language-plaintext highlighter-rouge">ssh -L</code> command by hand is fine until the connection drops or the workstation reboots, then the whole chain is broken silently. A systemd user unit fixes that.</p>

<div class="language-ini highlighter-rouge"><div class="highlight"><pre class="highlight"><code><span class="c"># ~/.config/systemd/user/remote-tunnel.service
</span><span class="nn">[Unit]</span>
<span class="py">Description</span><span class="p">=</span><span class="s">SSH tunnel to remote server (8080 -&gt; localhost:8080)</span>
<span class="py">After</span><span class="p">=</span><span class="s">network-online.target</span>
<span class="py">Wants</span><span class="p">=</span><span class="s">network-online.target</span>
<span class="py">StartLimitIntervalSec</span><span class="p">=</span><span class="s">300</span>
<span class="py">StartLimitBurst</span><span class="p">=</span><span class="s">4</span>

<span class="nn">[Service]</span>
<span class="py">Type</span><span class="p">=</span><span class="s">simple</span>
<span class="py">ExecStart</span><span class="p">=</span><span class="s">/usr/bin/ssh -N -i /home/user/.ssh/some_key -o IdentitiesOnly=yes -o BatchMode=yes -o ConnectTimeout=10 -o ExitOnForwardFailure=yes -o ServerAliveInterval=30 -o ServerAliveCountMax=3 -o StrictHostKeyChecking=accept-new -L 8080:localhost:8080 -p 22 user@192.168.1.50</span>
<span class="py">Restart</span><span class="p">=</span><span class="s">always</span>
<span class="py">RestartSec</span><span class="p">=</span><span class="s">15</span>

<span class="nn">[Install]</span>
<span class="py">WantedBy</span><span class="p">=</span><span class="s">default.target</span>
</code></pre></div></div>

<p>A couple of flags are doing more than they look like. <code class="language-plaintext highlighter-rouge">ExitOnForwardFailure=yes</code> matters because without it, SSH can come up “successfully” even when the port bind failed, sitting there alive but useless, and <code class="language-plaintext highlighter-rouge">Restart=always</code> never triggers because systemd thinks it’s fine. <code class="language-plaintext highlighter-rouge">ServerAliveInterval</code> and <code class="language-plaintext highlighter-rouge">ServerAliveCountMax</code> exist for the same reason: a dead connection (router blip, server reboot) can otherwise sit as a zombie process instead of exiting and letting systemd restart it.</p>

<p>Enable it as a user unit, since everything else on this workstation already runs rootless:</p>

<div class="language-bash highlighter-rouge"><div class="highlight"><pre class="highlight"><code><span class="nb">mkdir</span> <span class="nt">-p</span> ~/.config/systemd/user
systemctl <span class="nt">--user</span> daemon-reload
systemctl <span class="nt">--user</span> <span class="nb">enable</span> <span class="nt">--now</span> remote-tunnel.service
</code></pre></div></div>

<h1 id="testing-it">Testing it</h1>

<p>Check the tunnel process is actually up:</p>

<div class="language-bash highlighter-rouge"><div class="highlight"><pre class="highlight"><code>systemctl <span class="nt">--user</span> status remote-tunnel.service
</code></pre></div></div>

<blockquote>
  <p>Active: active (running) since …
Main PID: 48213 (ssh)</p>
</blockquote>

<p>Then confirm the tailnet path end to end from another device on the tailnet:</p>

<div class="language-bash highlighter-rouge"><div class="highlight"><pre class="highlight"><code>curl remote-webapp.your-tailnet.ts.net:8080
</code></pre></div></div>
<p>If that returns the expected response, the whole chain (tailnet to workstation to loopback tunnel to server) is working.</p>]]></content><author><name>Roberto Chang-Silva</name><email>rjavierch@seoultech.ac.kr</email><uri>https://air.seoultech.ac.kr/index.do</uri></author><category term="workflows-code" /><category term="tailscale" /><category term="ssh" /><category term="systemd" /><category term="homelab" /><category term="networking" /><summary type="html"><![CDATA[How to expose a service bound to localhost on a remote server by chaining a persistent SSH tunnel into Tailscale Serve, plus the systemd unit to keep it alive.]]></summary></entry><entry><title type="html">Running code-server on a remote workstation, bound to my VPN</title><link href="https://roberto-chang-silva.github.io/posts/code-server-tailscale-coreos/" rel="alternate" type="text/html" title="Running code-server on a remote workstation, bound to my VPN" /><published>2026-08-27T00:00:00+00:00</published><updated>2026-08-27T00:00:00+00:00</updated><id>https://roberto-chang-silva.github.io/posts/code-server-tailscale-coreos</id><content type="html" xml:base="https://roberto-chang-silva.github.io/posts/code-server-tailscale-coreos/"><![CDATA[<p><img src="/images/code-server-tailscale-coreos/code-server-remote-installation.png" alt="Remote code-server setup diagram" /></p>

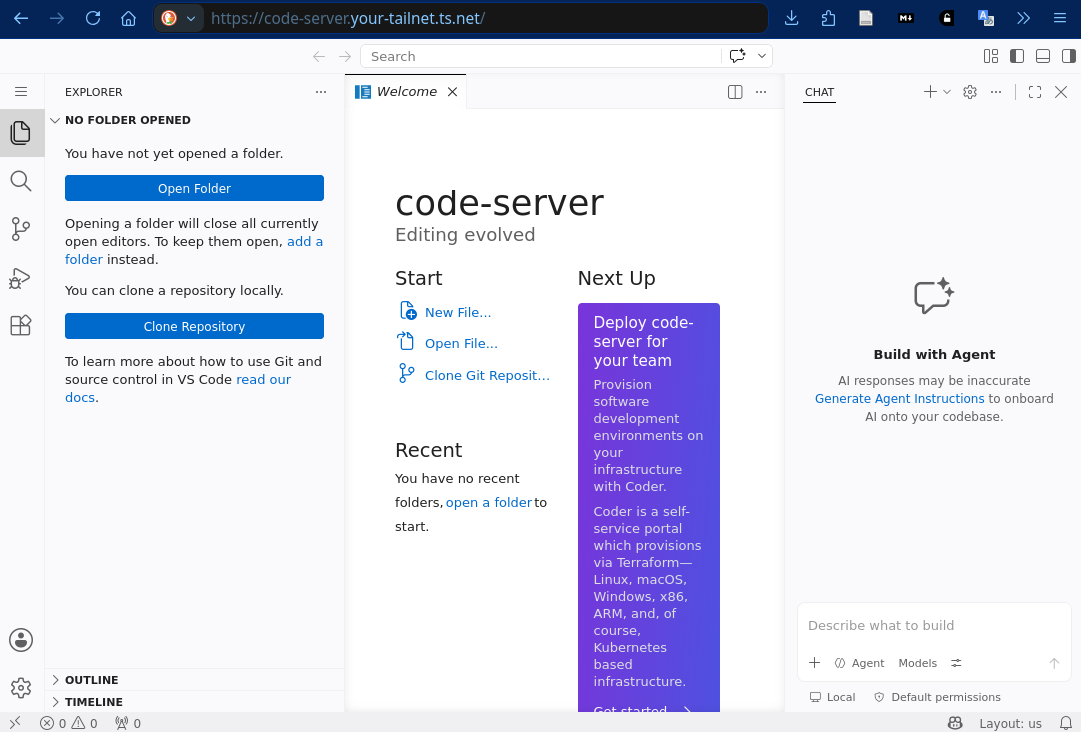
<p>I bought a cheap Chromebook because I was just curious about, got it very cheap, almost free, and quickly realized VS Code’s desktop app is not something you want to run on a dual-core Celeron with 4GB of RAM. The plan instead: run the editor on one of my homelab boxes and just hit it from the browser. code-server does exactly that, but getting it installed on Fedora CoreOS without touching the base image (and without exposing it past Tailscale) took a bit more care than the install docs let on.</p>

<h1 id="why-not-just-use-the-installer-as-is">Why not just use the installer as-is</h1>

<p>code-server ships a one-line installer:</p>

<div class="language-bash highlighter-rouge"><div class="highlight"><pre class="highlight"><code>curl <span class="nt">-fsSL</span> https://code-server.dev/install.sh | sh
</code></pre></div></div>

<p>Looks harmless, but if you actually read the script, on Fedora it defaults to this path:</p>

<div class="language-bash highlighter-rouge"><div class="highlight"><pre class="highlight"><code>fedora | opensuse<span class="o">)</span> npm_fallback install_rpm <span class="p">;;</span>
</code></pre></div></div>

<p>which runs <code class="language-plaintext highlighter-rouge">sudo rpm -U package.rpm</code> under the hood. That’s a system-wide install requiring root, and it fights rpm-ostree’s transactional model on an immutable host. Not what I wanted on CoreOS. The script does have a standalone mode that installs into <code class="language-plaintext highlighter-rouge">~/.local</code> with no root and no package manager involved at all, it just isn’t the default.</p>

<h1 id="how-to-do-it">How to do it?</h1>

<p><strong>Step 1:</strong> Install in standalone mode, which keeps everything inside your home directory:</p>

<div class="language-bash highlighter-rouge"><div class="highlight"><pre class="highlight"><code>curl <span class="nt">-fsSL</span> https://code-server.dev/install.sh | sh <span class="nt">-s</span> <span class="nt">--</span> <span class="nt">--method</span><span class="o">=</span>standalone
</code></pre></div></div>

<p><strong>Step 2:</strong> Make sure <code class="language-plaintext highlighter-rouge">~/.local/bin</code> is actually on your PATH (CoreOS’s default profile doesn’t include it):</p>

<div class="language-bash highlighter-rouge"><div class="highlight"><pre class="highlight"><code><span class="nb">echo</span> <span class="s1">'export PATH="$HOME/.local/bin:$PATH"'</span> <span class="o">&gt;&gt;</span> ~/.bashrc
<span class="nb">source</span> ~/.bashrc
</code></pre></div></div>

<p><strong>Step 3:</strong> Write a minimal config at <code class="language-plaintext highlighter-rouge">~/.config/code-server/config.yaml</code> that only listens on the machine’s localhost or your private VPNs address, Tailscale address, not on all interfaces:</p>

<div class="language-yaml highlighter-rouge"><div class="highlight"><pre class="highlight"><code><span class="na">bind-addr</span><span class="pi">:</span> <span class="s">100.x.x.x:8080</span>
<span class="na">auth</span><span class="pi">:</span> <span class="s">password</span>
<span class="na">password</span><span class="pi">:</span> <span class="s">some-long-random-string</span>
<span class="na">cert</span><span class="pi">:</span> <span class="no">false</span>
</code></pre></div></div>

<p>I used a real password here instead of <code class="language-plaintext highlighter-rouge">auth: none</code>. Tailscale ACLs already gate who can reach the tailnet, but binding to the Tailscale IP directly (rather than <code class="language-plaintext highlighter-rouge">127.0.0.1</code> plus some separate tunneling step) means the port is only reachable at all through the tailnet interface, so a password is just a second layer that costs nothing. Though, it is not safe as it is written in plain text in the home folder.</p>

<p><strong>Step 4:</strong> Set it up as a systemd user service so it survives reboots without needing an active login shell:</p>

<div class="language-ini highlighter-rouge"><div class="highlight"><pre class="highlight"><code><span class="nn">[Unit]</span>
<span class="py">Description</span><span class="p">=</span><span class="s">code-server</span>
<span class="py">After</span><span class="p">=</span><span class="s">network-online.target</span>

<span class="nn">[Service]</span>
<span class="py">ExecStart</span><span class="p">=</span><span class="s">%h/.local/bin/code-server</span>
<span class="py">Restart</span><span class="p">=</span><span class="s">always</span>

<span class="nn">[Install]</span>
<span class="py">WantedBy</span><span class="p">=</span><span class="s">default.target</span>
</code></pre></div></div>

<p>Save that as <code class="language-plaintext highlighter-rouge">~/.config/systemd/user/code-server.service</code>, then:</p>

<div class="language-bash highlighter-rouge"><div class="highlight"><pre class="highlight"><code>systemctl <span class="nt">--user</span> daemon-reload
systemctl <span class="nt">--user</span> <span class="nb">enable</span> <span class="nt">--now</span> code-server
<span class="nb">sudo </span>loginctl enable-linger <span class="nv">$USER</span>
</code></pre></div></div>

<p>The <code class="language-plaintext highlighter-rouge">loginctl enable-linger</code> step matters, without it the service dies as soon as you log out of the SSH session that started it.</p>

<h1 id="testing-it">Testing it</h1>

<p>From the Chromebook, over Tailscale, not the public internet:</p>

<div class="language-bash highlighter-rouge"><div class="highlight"><pre class="highlight"><code>curl <span class="nt">-I</span> http://100.x.x.x:8080
</code></pre></div></div>

<blockquote>
  <p>HTTP/1.1 200 OK</p>
</blockquote>

<p>And from the browser, hitting <code class="language-plaintext highlighter-rouge">http://100.x.x.x:8080</code> (or the MagicDNS name if you’ve set that up) should drop you straight into the login prompt, then the full VS Code UI, running entirely on the remote box.</p>

<h1 id="serving-it-with-tailscale-serve-instead-of-a-raw-bind">Serving it with tailscale serve instead of a raw bind</h1>

<p>Binding directly to the Tailscale IP works, but there’s a cleaner way that also gets you HTTPS with a proper cert: <code class="language-plaintext highlighter-rouge">tailscale serve</code> with a named Service. Instead of exposing the raw <code class="language-plaintext highlighter-rouge">100.x.x.x:8080</code> address, this gives code-server a real HTTPS URL on your tailnet’s MagicDNS domain.</p>

<p><strong>Step 1:</strong> Point code-server at localhost only, since <code class="language-plaintext highlighter-rouge">tailscale serve</code> will handle the tailnet-facing side:</p>

<div class="language-yaml highlighter-rouge"><div class="highlight"><pre class="highlight"><code><span class="na">bind-addr</span><span class="pi">:</span> <span class="s">127.0.0.1:8080</span>
<span class="na">auth</span><span class="pi">:</span> <span class="s">password</span>
<span class="na">password</span><span class="pi">:</span> <span class="s">some-long-random-string</span>
<span class="na">cert</span><span class="pi">:</span> <span class="no">false</span>
</code></pre></div></div>

<p><strong>Step 2:</strong> Advertise it as a named Service:</p>

<div class="language-bash highlighter-rouge"><div class="highlight"><pre class="highlight"><code>tailscale serve <span class="nt">--service</span><span class="o">=</span>svc:code-server <span class="nt">--bg</span> <span class="nt">--https</span><span class="o">=</span>443 http://127.0.0.1:8080
</code></pre></div></div>

<p>That should return something like:</p>

<div class="language-bash highlighter-rouge"><div class="highlight"><pre class="highlight"><code>tailscale serve <span class="nt">--service</span><span class="o">=</span>svc:code-server <span class="nt">--bg</span> <span class="nt">--https</span><span class="o">=</span>443 http://127.0.0.1:8080
</code></pre></div></div>

<blockquote>
  <p>Available within your tailnet: https://code-server.your-tailnet.ts.net/</p>
</blockquote>

<p>The <code class="language-plaintext highlighter-rouge">--service=svc:code-server</code> bit is what makes this different from a plain <code class="language-plaintext highlighter-rouge">tailscale serve</code>, it names the thing as a proper Service rather than just exposing a port on the current node, which matters if you ever want to move it to another machine later without changing the URL everyone (well, you) connects to.</p>

<p>One thing worth calling out: before <code class="language-plaintext highlighter-rouge">--service=svc:code-server</code> will actually work, the Service itself needs to exist in your tailnet, you can’t just invent a name on the command line and have it appear. Head to the Tailscale admin console, under Services, and create one named <code class="language-plaintext highlighter-rouge">code-server</code> there first (or via the declarative config file if you’re managing your tailnet that way). Once it’s defined and your node is approved to host it, the <code class="language-plaintext highlighter-rouge">tailscale serve --service=svc:code-server ...</code> command above will attach to that Service rather than failing or silently doing nothing.</p>

<p><strong>Step 3:</strong> Check it’s actually up:</p>

<div class="language-bash highlighter-rouge"><div class="highlight"><pre class="highlight"><code>tailscale serve status
</code></pre></div></div>

<p><strong>Step 4:</strong> If you need to take it down later, don’t just kill the service, drain it first so any open connections close gracefully:</p>

<div class="language-bash highlighter-rouge"><div class="highlight"><pre class="highlight"><code>tailscale serve <span class="nt">--service</span><span class="o">=</span>svc:code-server <span class="nt">--https</span><span class="o">=</span>443 off
</code></pre></div></div>

<p>One gotcha: the <code class="language-plaintext highlighter-rouge">--bg</code> flag matters if you want this to survive reboots or <code class="language-plaintext highlighter-rouge">tailscale down</code>/<code class="language-plaintext highlighter-rouge">up</code> cycles without manual intervention. Without it, restarting Tailscale drops the serve config and you have to re-run the command by hand.</p>

<h1 id="how-to-uninstall-it">How to uninstall it</h1>

<p>Since it’s a standalone install with no package manager involved, uninstalling is just removing files and the service:</p>

<p><strong>Step 1:</strong> Stop and disable the service:</p>
<div class="language-bash highlighter-rouge"><div class="highlight"><pre class="highlight"><code>systemctl <span class="nt">--user</span> disable <span class="nt">--now</span> code-server
</code></pre></div></div>

<p><strong>Step 2:</strong> Remove the service file:</p>
<div class="language-bash highlighter-rouge"><div class="highlight"><pre class="highlight"><code><span class="nb">rm</span> ~/.config/systemd/user/code-server.service
systemctl <span class="nt">--user</span> daemon-reload
</code></pre></div></div>

<p><strong>Step 3:</strong> Remove the binary and installed files:</p>
<div class="language-bash highlighter-rouge"><div class="highlight"><pre class="highlight"><code><span class="nb">rm</span> <span class="nt">-rf</span> ~/.local/lib/code-server-<span class="k">*</span>
<span class="nb">rm</span> ~/.local/bin/code-server
</code></pre></div></div>

<p><strong>Step 4:</strong> Remove config and data (your settings, extensions, etc.):</p>
<div class="language-bash highlighter-rouge"><div class="highlight"><pre class="highlight"><code><span class="nb">rm</span> <span class="nt">-rf</span> ~/.config/code-server
<span class="nb">rm</span> <span class="nt">-rf</span> ~/.local/share/code-server
</code></pre></div></div>

<p><strong>Step 5 (optional):</strong> Clear the install cache:</p>
<div class="language-bash highlighter-rouge"><div class="highlight"><pre class="highlight"><code><span class="nb">rm</span> <span class="nt">-rf</span> ~/.cache/code-server
</code></pre></div></div>

<p><strong>Step 6 (optional):</strong> If you enabled lingering just for this service and don’t need it for anything else running under your user:</p>
<div class="language-bash highlighter-rouge"><div class="highlight"><pre class="highlight"><code><span class="nb">sudo </span>loginctl disable-linger <span class="nv">$USER</span>
</code></pre></div></div>

<p>That’s it, nothing touches the base CoreOS image since it was never involved in the first place. If you also set a Tailscale ACL rule specifically to allow reaching port 8080, worth cleaning that up too so it doesn’t linger as an unused rule.</p>

<h1 id="notes">Notes</h1>

<ul>
  <li>The installer’s default “detect” mode will try <code class="language-plaintext highlighter-rouge">sudo rpm -U</code> on Fedora. Always pass <code class="language-plaintext highlighter-rouge">--method=standalone</code> on CoreOS or anything immutable, or you’ll get a permission prompt you didn’t expect.</li>
  <li>There’s no auto-update mechanism with the standalone method. Updating means re-running the install script (it pulls whatever’s latest and just symlinks the new binary in) and restarting the service. Old versions pile up quietly in <code class="language-plaintext highlighter-rouge">~/.local/lib</code> until you clean them out by hand.</li>
  <li>Binding to <code class="language-plaintext highlighter-rouge">127.0.0.1</code> and expecting Tailscale to somehow expose it doesn’t work on its own, you either bind directly to the Tailscale interface IP (what I did here) or use <code class="language-plaintext highlighter-rouge">tailscale serve</code> in front of a loopback-bound service. Worth knowing before you spend ten minutes wondering why the port is unreachable.</li>
  <li><code class="language-plaintext highlighter-rouge">code tunnel</code> (Microsoft’s own tool) is a faster path to the same result, but it routes traffic through Microsoft’s relay servers instead of staying inside your own network. Given everything else here already runs on Tailscale, self-hosting code-server was the more consistent choice.</li>
</ul>]]></content><author><name>Roberto Chang-Silva</name><email>rjavierch@seoultech.ac.kr</email><uri>https://air.seoultech.ac.kr/index.do</uri></author><category term="workflows-code" /><category term="code-server" /><category term="tailscale" /><category term="fedora-coreos" /><category term="homelab" /><category term="remote-dev" /><summary type="html"><![CDATA[I bought a cheap Chromebook on a whim and quickly realized VS Code's desktop app isn't something you want to run on a dual-core Celeron with 4GB of RAM.]]></summary></entry><entry><title type="html">Getting Tailscale’s ethtool offload tweak to persist on Fedora uCore</title><link href="https://roberto-chang-silva.github.io/posts/tailscale-ethtool-offload-networkmanager-dispatcher/" rel="alternate" type="text/html" title="Getting Tailscale’s ethtool offload tweak to persist on Fedora uCore" /><published>2026-08-20T00:00:00+00:00</published><updated>2026-08-20T00:00:00+00:00</updated><id>https://roberto-chang-silva.github.io/posts/tailscale-ethtool-offload-networkmanager-dispatcher</id><content type="html" xml:base="https://roberto-chang-silva.github.io/posts/tailscale-ethtool-offload-networkmanager-dispatcher/"><![CDATA[<p>Tailscale’s docs for subnet routers and exit nodes tell you to run an <code class="language-plaintext highlighter-rouge">ethtool</code> command to enable UDP GRO forwarding, then persist it with a <code class="language-plaintext highlighter-rouge">networkd-dispatcher</code> script. Problem: on Fedora uCore (and Kinoite, Silverblue, anything ostree-based really), there’s no <code class="language-plaintext highlighter-rouge">networkd-dispatcher</code> at all. These systems run NetworkManager, not systemd-networkd, so the official instructions just don’t apply. Here’s what actually works.</p>

<h1 id="why-the-official-instructions-dont-apply-here">Why the official instructions don’t apply here</h1>

<p><code class="language-plaintext highlighter-rouge">networkd-dispatcher</code> is a hook mechanism for <code class="language-plaintext highlighter-rouge">systemd-networkd</code>. uCore doesn’t use <code class="language-plaintext highlighter-rouge">systemd-networkd</code>, it uses NetworkManager, same as regular Fedora Workstation. The good news is NetworkManager has had its own equivalent dispatcher mechanism for years, it’s already enabled by default, and you don’t need to layer any extra package to use it.</p>

<h1 id="setting-up-the-networkmanager-dispatcher-script">Setting up the NetworkManager dispatcher script</h1>

<p>NetworkManager runs scripts from <code class="language-plaintext highlighter-rouge">/etc/NetworkManager/dispatcher.d/</code> in alphabetical order whenever an interface changes state (up, down, connectivity change, etc). Since <code class="language-plaintext highlighter-rouge">/etc</code> is writable and survives <code class="language-plaintext highlighter-rouge">rpm-ostree</code> deployments, the script lives there permanently, same as your <code class="language-plaintext highlighter-rouge">/etc/NetworkManager/system-connections/</code> files.</p>

<p>Create the script:</p>

<div class="language-bash highlighter-rouge"><div class="highlight"><pre class="highlight"><code><span class="nb">sudo mkdir</span> <span class="nt">-p</span> /etc/NetworkManager/dispatcher.d
<span class="nb">sudo tee</span> /etc/NetworkManager/dispatcher.d/50-tailscale <span class="o">&lt;&lt;</span><span class="sh">'</span><span class="no">EOF</span><span class="sh">'
#!/bin/sh

if [ "</span><span class="nv">$2</span><span class="sh">" = "up" ] || [ "</span><span class="nv">$2</span><span class="sh">" = "connectivity-change" ]; then
    NETDEV=</span><span class="si">$(</span>ip <span class="nt">-o</span> route get 8.8.8.8 | <span class="nb">cut</span> <span class="nt">-f</span> 5 <span class="nt">-d</span> <span class="s2">" "</span><span class="si">)</span><span class="sh">
    ethtool -K "</span><span class="nv">$NETDEV</span><span class="sh">" rx-udp-gro-forwarding on rx-gro-list off
fi
</span><span class="no">EOF
</span></code></pre></div></div>

<p>Then fix ownership and permissions. NetworkManager silently refuses to run dispatcher scripts that are group or world writable, or not owned by root, so this isn’t optional:</p>

<div class="language-bash highlighter-rouge"><div class="highlight"><pre class="highlight"><code><span class="nb">sudo chown </span>root:root /etc/NetworkManager/dispatcher.d/50-tailscale
<span class="nb">sudo chmod </span>0755 /etc/NetworkManager/dispatcher.d/50-tailscale
<span class="nb">sudo </span>restorecon /etc/NetworkManager/dispatcher.d/50-tailscale
</code></pre></div></div>

<p>That last <code class="language-plaintext highlighter-rouge">restorecon</code> call matters more than it looks. SELinux expects a specific context on dispatcher scripts, and if it’s wrong the script just won’t run, with no error telling you why.</p>

<h1 id="testing-it">Testing it</h1>

<p>Run it manually first before trusting the automatic trigger:</p>

<div class="language-bash highlighter-rouge"><div class="highlight"><pre class="highlight"><code><span class="nb">sudo</span> /etc/NetworkManager/dispatcher.d/50-tailscale
<span class="nb">echo</span> <span class="nv">$?</span>
</code></pre></div></div>

<blockquote>
  <p>0</p>
</blockquote>

<p>A <code class="language-plaintext highlighter-rouge">0</code> means it ran clean. If <code class="language-plaintext highlighter-rouge">ethtool</code> isn’t installed (uCore’s base image is minimal, it’s not guaranteed to be there), you’ll get a command not found error instead. Check with <code class="language-plaintext highlighter-rouge">which ethtool</code>; if it’s missing, layer it with <code class="language-plaintext highlighter-rouge">rpm-ostree install ethtool</code> and reboot, or run it from a toolbox container if you’d rather not layer packages on the host.</p>

<p>Next, confirm the dispatcher service itself is alive:</p>

<div class="language-bash highlighter-rouge"><div class="highlight"><pre class="highlight"><code>systemctl status NetworkManager-dispatcher
</code></pre></div></div>

<p>Don’t panic if this shows <code class="language-plaintext highlighter-rouge">inactive (dead)</code>. It’s D-Bus activated, meaning it spawns on demand when NetworkManager fires an event, does its thing, then exits. That’s normal, not broken. If it’s masked or disabled outright though, turn it on with <code class="language-plaintext highlighter-rouge">sudo systemctl enable --now NetworkManager-dispatcher.service</code>.</p>

<p>To confirm it actually fires and applies the setting, bounce the relevant interface and check the flags:</p>

<div class="language-bash highlighter-rouge"><div class="highlight"><pre class="highlight"><code>nmcli connection down enp1s0 <span class="o">&amp;&amp;</span> nmcli connection up enp1s0
ethtool <span class="nt">-k</span> <span class="s2">"</span><span class="si">$(</span>ip <span class="nt">-o</span> route get 8.8.8.8 | <span class="nb">cut</span> <span class="nt">-f</span> 5 <span class="nt">-d</span> <span class="s1">' '</span><span class="si">)</span><span class="s2">"</span> | <span class="nb">grep</span> <span class="nt">-E</span> <span class="s2">"rx-udp-gro-forwarding|rx-gro-list"</span>
</code></pre></div></div>

<blockquote>
  <p>rx-udp-gro-forwarding: on
rx-gro-list: off</p>
</blockquote>

<p>If you don’t see that, tail the dispatcher’s log while you reconnect the interface, it’ll tell you if the script is even being invoked:</p>

<div class="language-bash highlighter-rouge"><div class="highlight"><pre class="highlight"><code>journalctl <span class="nt">-u</span> NetworkManager-dispatcher <span class="nt">-f</span>
</code></pre></div></div>

<h1 id="notes">Notes</h1>

<ul>
  <li>If you’ve got a dual-NIC box (internet-facing NIC plus a second one for LAN or a shared connection), double check <code class="language-plaintext highlighter-rouge">$NETDEV</code> resolves to the actual uplink interface, not the LAN-facing one. The <code class="language-plaintext highlighter-rouge">ip -o route get 8.8.8.8</code> trick handles this correctly on its own since it follows the real default route, but worth a sanity check the first time.</li>
  <li>Tailscale’s upstream doc assumes a single-NIC box. On multi-NIC setups just make sure the dispatcher script is targeting the interface that’s actually acting as your exit-node or subnet-router uplink.</li>
  <li>The permission and SELinux context steps aren’t optional extras, skip either one and the script fails silently with no obvious error in the logs, which is a fun way to lose twenty minutes.</li>
</ul>]]></content><author><name>Roberto Chang-Silva</name><email>rjavierch@seoultech.ac.kr</email><uri>https://air.seoultech.ac.kr/index.do</uri></author><category term="homelab-systems" /><category term="fedora" /><category term="ucor" /><category term="networking" /><category term="tailscale" /><summary type="html"><![CDATA[Tailscale's UDP GRO forwarding docs assume networkd-dispatcher, but ostree-based systems like Fedora uCore run NetworkManager instead. Here's what works.]]></summary></entry><entry><title type="html">Exposing an SSH Server on a Non-Tailscale Machine via Tailscale Serve</title><link href="https://roberto-chang-silva.github.io/posts/tailscale-service-ssh-proxy/" rel="alternate" type="text/html" title="Exposing an SSH Server on a Non-Tailscale Machine via Tailscale Serve" /><published>2026-08-20T00:00:00+00:00</published><updated>2026-08-20T00:00:00+00:00</updated><id>https://roberto-chang-silva.github.io/posts/tailscale-service-ssh-proxy</id><content type="html" xml:base="https://roberto-chang-silva.github.io/posts/tailscale-service-ssh-proxy/"><![CDATA[<p>I ran into a problem recently. I needed to SSH into a server sitting on my office’s local network that cannot install Tailscale as it is a shared device in a small office, using my pc from outside. Fortunately, my workstation at the office right next to that server <em>does</em> have Tailscale installed. Instead of messing with complex router port forwarding or VPN gateways, I used Tailscale Services and a TCP forwarder to bridge these devices.</p>

<h1 id="setting-up-the-proxy">Setting Up the Proxy</h1>

<p>To route traffic from my laptop through the workstation and into the non-Tailscale server, I needed to configure both the Tailscale control panel and the workstation itself.</p>

<p><strong>Step 1:</strong> I want to my Tailscale Admin Console and create a new Service. I named  it something descriptive like <code class="language-plaintext highlighter-rouge">svc:my-office-local-server</code> and assign the incoming port as <code class="language-plaintext highlighter-rouge">tcp:22</code>.</p>

<p><strong>Step 2:</strong> On my remote workstation (same physical network of the shared server), I ran the Tailscale serve command to forward incoming Tailnet traffic over the local physical network to the target machine.</p>

<div class="language-bash highlighter-rouge"><div class="highlight"><pre class="highlight"><code><span class="nb">sudo </span>tailscale serve <span class="nt">--service</span><span class="o">=</span>svc:my-office-local-server <span class="nt">--tcp</span><span class="o">=</span>22 tcp://192.168.1.50:22
</code></pre></div></div>
<div class="language-bash highlighter-rouge"><div class="highlight"><pre class="highlight"><code>Available within your tailnet:

|-- tcp://my-office-local-server.tails-scales.ts.net:22 <span class="o">(</span>TLS over TCP<span class="o">)</span>
|-- tcp://&lt;tailscale IPv4&gt;:22
|-- tcp://&lt;tailscale IPv6&gt;:22
|--&gt; tcp://192.168.1.50:22

Serve started and running <span class="k">in </span>the background.
To disable the proxy, run: tailscale serve <span class="nt">--service</span><span class="o">=</span>svc:my-office-local-server <span class="nt">--tcp</span><span class="o">=</span>22 off
To remove config <span class="k">for </span>the service, run: tailscale serve clear svc:my-office-local-server 
</code></pre></div></div>

<p>Perhaps you’ll need to approve the connection in your Tailnet console.</p>

<h1 id="testing-it">Testing It</h1>

<p>Once the service is active and bound, I can attempt to connect from my remote pc or any other device on my Tailnet (if my ACLs allow it).</p>

<div class="language-bash highlighter-rouge"><div class="highlight"><pre class="highlight"><code>ssh username@my-office-local-server <span class="nt">-p</span> 22
</code></pre></div></div>

<blockquote>
  <p>Last login: Thu Aug 20 16:15:02 2026 from 100.64.0.5
username@office-server:~$</p>
</blockquote>

<p>And as simple as that, there’s no need for me to remember IPs or setting ssh-config files for remote connections on each personal machine.</p>]]></content><author><name>Roberto Chang-Silva</name><email>rjavierch@seoultech.ac.kr</email><uri>https://air.seoultech.ac.kr/index.do</uri></author><category term="homelab-systems" /><category term="tailscale" /><category term="networking" /><category term="homelab" /><summary type="html"><![CDATA[I needed to SSH into a shared office server that can't run Tailscale, so I bridged it through a nearby workstation using Tailscale Services and a TCP forwarder.]]></summary></entry><entry><title type="html">Disable Wifi powersave mode in my laptop (old, seems to be fixed)</title><link href="https://roberto-chang-silva.github.io/posts/disable-wifi-powersave-mode/" rel="alternate" type="text/html" title="Disable Wifi powersave mode in my laptop (old, seems to be fixed)" /><published>2026-08-17T00:00:00+00:00</published><updated>2026-08-17T00:00:00+00:00</updated><id>https://roberto-chang-silva.github.io/posts/disable-wifi-powersave-mode</id><content type="html" xml:base="https://roberto-chang-silva.github.io/posts/disable-wifi-powersave-mode/"><![CDATA[<p>Wi-Fi <strong>power-save</strong> in my Thinkpad (fedora OS) makes the card enter low-power mode when idle, causing <strong>high latency</strong>, <strong>jitter</strong>, and <strong>packet loss</strong> on sensitive connections like Tailscale, gaming, or VoIP. This doesn’t happen on Ethernet because it’s wired and stable. This happens becasue as I normally work with my laptop remotely to a workstation so to save some energy and get 8hrs battery i ran it in powersave mode. Also the Wifi signal is interrupted after suspending the laptop in this mode and can’t connect it without a reboot.</p>

<h1 id="how-to-do-it">How to do it?</h1>

<h2 id="solution-create-a-rule">Solution, create a rule</h2>
<div class="language-bash highlighter-rouge"><div class="highlight"><pre class="highlight"><code><span class="nb">sudo tee</span> /etc/NetworkManager/conf.d/00-wifi-powersave.conf <span class="o">&lt;&lt;</span> <span class="no">EOF</span><span class="sh"> &gt; /dev/null
[connection]
wifi.powersave=2
</span><span class="no">EOF

</span><span class="nb">sudo </span>systemctl restart NetworkManager.service
</code></pre></div></div>

<h2 id="what-does-each-line-do">What does each line do?</h2>
<p>| Line | Function |
|——-|———|
| <code class="language-plaintext highlighter-rouge">sudo tee ... &lt;&lt; EOF</code> | Writes root file with heredoc (avoids <code class="language-plaintext highlighter-rouge">Permission denied</code>) |
| <code class="language-plaintext highlighter-rouge">wifi.powersave=2</code> | <strong>Disables</strong> power-save globally (2=off, 3=on) |
| <code class="language-plaintext highlighter-rouge">restart NetworkManager</code> | Applies changes immediately |</p>

<h2 id="verify-it-works">Verify it works</h2>
<div class="language-bash highlighter-rouge"><div class="highlight"><pre class="highlight"><code><span class="c"># 1. File created</span>
<span class="nb">cat</span> /etc/NetworkManager/conf.d/00-wifi-powersave.conf

<span class="c"># 2. Power management OFF</span>
iwconfig wlp2s0 | <span class="nb">grep</span> <span class="s2">"Power Management"</span>

<span class="c"># 3. Test Tailscale</span>
tailscale ping &lt;remote-IP&gt;
</code></pre></div></div>

<div class="language-plaintext highlighter-rouge"><div class="highlight"><pre class="highlight"><code># for Fedora
iw dev wlp2s0 get power_save
</code></pre></div></div>

<h2 id="wifipowersave-values"><code class="language-plaintext highlighter-rouge">wifi.powersave</code> values</h2>
<div class="language-plaintext highlighter-rouge"><div class="highlight"><pre class="highlight"><code>0 = Default (automatic)
1 = Don't touch
2 = OFF (this is what we want) ✅
3 = ON (avoid)
</code></pre></div></div>

<p><strong>Note</strong>: Related to this <a href="https://gist.github.com/jcberthon/ea8cfe278998968ba7c5a95344bc8b55">gist.github</a></p>]]></content><author><name>Roberto Chang-Silva</name><email>rjavierch@seoultech.ac.kr</email><uri>https://air.seoultech.ac.kr/index.do</uri></author><category term="notes-snippets" /><category term="linux-desktop" /><category term="networking" /><category term="thinkpad" /><summary type="html"><![CDATA[Wi-Fi power-save mode on my Fedora ThinkPad causes latency, jitter, and packet loss on Tailscale and VoIP, plus connection drops after suspend. Here's the fix.]]></summary></entry><entry><title type="html">A small Glance setup with Podman, feeds, and Tailscale. A personal feed!</title><link href="https://roberto-chang-silva.github.io/posts/glance-podman-tailscale/" rel="alternate" type="text/html" title="A small Glance setup with Podman, feeds, and Tailscale. A personal feed!" /><published>2026-08-17T00:00:00+00:00</published><updated>2026-08-17T00:00:00+00:00</updated><id>https://roberto-chang-silva.github.io/posts/glance-podman-tailscale</id><content type="html" xml:base="https://roberto-chang-silva.github.io/posts/glance-podman-tailscale/"><![CDATA[<p>I wanted a lightweight dashboard for research, news, and YouTube feeds without having to look to all the bloat is out there in the internet. Glance fits nicely (at least for me): it is just a self-hosted dashboard, so the setup is mostly a container, a config directory, and accepting that RSS is still the least exciting but most reliable web API. I deploy this in a spare raspberry pi I had with all my devices using Tailscale personal VPN.</p>

<h1 id="running-glance-with-podman">Running Glance with Podman</h1>

<p>Glance listens on port <code class="language-plaintext highlighter-rouge">8080</code> (as of today, at least) in its container. Binding that port only to loopback keeps it off the LAN; Tailscale Serve will provide the HTTPS endpoint for devices in the tailnet. Glance’s upstream image uses <code class="language-plaintext highlighter-rouge">/app/config</code> for its configuration files. <a href="https://github.com/glanceapp/glance">github</a></p>

<p><strong>Step 1:</strong> Create a working directory and configuration directory.</p>

<div class="language-bash highlighter-rouge"><div class="highlight"><pre class="highlight"><code><span class="nb">mkdir</span> <span class="nt">-p</span> ~/containers/glance/config
<span class="nb">cd</span> ~/containers/glance
</code></pre></div></div>

<p><strong>Step 2:</strong> Create <code class="language-plaintext highlighter-rouge">compose.yml</code>.</p>

<div class="language-yaml highlighter-rouge"><div class="highlight"><pre class="highlight"><code><span class="na">services</span><span class="pi">:</span>
  <span class="na">glance</span><span class="pi">:</span>
    <span class="na">container_name</span><span class="pi">:</span> <span class="s">glance</span>
    <span class="na">image</span><span class="pi">:</span> <span class="s">docker.io/glanceapp/glance:latest</span>
    <span class="na">restart</span><span class="pi">:</span> <span class="s">unless-stopped</span>
    <span class="na">ports</span><span class="pi">:</span>
      <span class="pi">-</span> <span class="s2">"</span><span class="s">127.0.0.1:8080:8080"</span>
    <span class="na">volumes</span><span class="pi">:</span>
      <span class="pi">-</span> <span class="s">./config:/app/config:Z</span>
</code></pre></div></div>

<p>The <code class="language-plaintext highlighter-rouge">:Z</code> volume suffix relabels the bind-mounted directory for SELinux, which avoids the usual Fedora-family “permission denied” surprise when the container tries to read the config.</p>

<p><strong>Step 3:</strong> Start it with Podman Compose.</p>

<div class="language-bash highlighter-rouge"><div class="highlight"><pre class="highlight"><code>podman compose up <span class="nt">-d</span>
</code></pre></div></div>

<blockquote>
  <p>Container <code class="language-plaintext highlighter-rouge">glance</code> starts and port <code class="language-plaintext highlighter-rouge">127.0.0.1:8080</code> is published on the host.</p>
</blockquote>

<h1 id="adding-feeds">Adding feeds</h1>

<p>Create <code class="language-plaintext highlighter-rouge">config/glance.yml</code> with one page and a couple of feed widgets. Glance’s feed widget accepts feed URLs, optional titles, and item limits. <a href="https://raw.githubusercontent.com/glanceapp/glance/main/docs/configuration.md">raw.githubusercontent</a></p>

<p>This is only an example because i will not share my own personal setup</p>

<div class="language-yaml highlighter-rouge"><div class="highlight"><pre class="highlight"><code><span class="na">pages</span><span class="pi">:</span>
  <span class="pi">-</span> <span class="na">name</span><span class="pi">:</span> <span class="s">Home</span>
    <span class="na">columns</span><span class="pi">:</span>
      <span class="pi">-</span> <span class="na">size</span><span class="pi">:</span> <span class="s">small</span>
        <span class="na">widgets</span><span class="pi">:</span>
          <span class="pi">-</span> <span class="na">type</span><span class="pi">:</span> <span class="s">rss</span>
            <span class="na">title</span><span class="pi">:</span> <span class="s">Research and climate</span>
            <span class="na">limit</span><span class="pi">:</span> <span class="m">8</span>
            <span class="na">feeds</span><span class="pi">:</span>
              <span class="pi">-</span> <span class="na">url</span><span class="pi">:</span> <span class="s">https://www.nature.com/nclimate.rss</span>
                <span class="na">title</span><span class="pi">:</span> <span class="s">Nature Climate Change</span>
              <span class="pi">-</span> <span class="na">url</span><span class="pi">:</span> <span class="s">https://agupubs.onlinelibrary.wiley.com/feed/19422466/most-recent</span>
                <span class="na">title</span><span class="pi">:</span> <span class="s">AGU Earth and Space Science</span>

      <span class="pi">-</span> <span class="na">size</span><span class="pi">:</span> <span class="s">full</span>
        <span class="na">widgets</span><span class="pi">:</span>
          <span class="pi">-</span> <span class="na">type</span><span class="pi">:</span> <span class="s">rss</span>
            <span class="na">title</span><span class="pi">:</span> <span class="s">Infrastructure</span>
            <span class="na">limit</span><span class="pi">:</span> <span class="m">8</span>
            <span class="na">feeds</span><span class="pi">:</span>
              <span class="pi">-</span> <span class="na">url</span><span class="pi">:</span> <span class="s">https://www.redhat.com/en/rss/blog/channel/red-hat-enterprise-linux</span>
                <span class="na">title</span><span class="pi">:</span> <span class="s">Red Hat Enterprise Linux</span>
              <span class="pi">-</span> <span class="na">url</span><span class="pi">:</span> <span class="s">https://www.cncf.io/feed/</span>
                <span class="na">title</span><span class="pi">:</span> <span class="s">CNCF</span>

      <span class="pi">-</span> <span class="na">size</span><span class="pi">:</span> <span class="s">small</span>
        <span class="na">widgets</span><span class="pi">:</span>
          <span class="pi">-</span> <span class="na">type</span><span class="pi">:</span> <span class="s">videos</span>
            <span class="na">title</span><span class="pi">:</span> <span class="s">YouTube</span>
            <span class="na">channels</span><span class="pi">:</span>
              <span class="pi">-</span> <span class="s">UCg6gPGh8HU2U01vaFCAsvmQ</span>
              <span class="pi">-</span> <span class="s">UCR-DXc1voovS8nhAvccRZhg</span>
</code></pre></div></div>

<p>The <code class="language-plaintext highlighter-rouge">videos</code> widget uses YouTube channel IDs rather than a normal channel URL. A practical way to find one is to open the channel’s page source or use YouTube’s channel URL after it resolves to a <code class="language-plaintext highlighter-rouge">/channel/UC...</code> address. Glance also supports a YouTube search URL pattern where a widget needs search-based discovery rather than a fixed channel. <a href="https://raw.githubusercontent.com/glanceapp/glance/main/docs/configuration.md">raw.githubusercontent</a></p>

<p>Restart the container after editing the config.</p>

<div class="language-bash highlighter-rouge"><div class="highlight"><pre class="highlight"><code>podman compose restart glance
</code></pre></div></div>

<h1 id="testing-it">Testing it</h1>

<p>First, verify that Glance is answering locally.</p>

<div class="language-bash highlighter-rouge"><div class="highlight"><pre class="highlight"><code>curl <span class="nt">-I</span> http://127.0.0.1:8080
</code></pre></div></div>

<blockquote>
  <p><code class="language-plaintext highlighter-rouge">HTTP/1.1 200 OK</code></p>
</blockquote>

<p>Then check the container’s parsed configuration and feed errors, if any.</p>

<h1 id="serving-it-through-tailscale">Serving it through Tailscale</h1>

<p>Tailscale Serve can reverse-proxy a local HTTP service to an HTTPS URL that is reachable only inside the tailnet. It supports a local port or loopback URL as the proxy target. <a href="https://tailscale.com/docs/reference/examples/serve">tailscale</a></p>

<p><strong>Step 1:</strong> Confirm that Tailscale is connected on the host.</p>

<div class="language-bash highlighter-rouge"><div class="highlight"><pre class="highlight"><code>tailscale status
</code></pre></div></div>

<blockquote>
  <p>The current machine appears as a connected node in the tailnet.</p>
</blockquote>

<p><strong>Step 2:</strong> Point Tailscale Serve at Glance’s loopback-only port.</p>

<div class="language-bash highlighter-rouge"><div class="highlight"><pre class="highlight"><code><span class="nb">sudo </span>tailscale serve http://127.0.0.1:8080
</code></pre></div></div>

<blockquote>
  <p>Available within your tailnet:</p>

  <p><code class="language-plaintext highlighter-rouge">https://&lt;machine-name&gt;.&lt;tailnet-name&gt;.ts.net</code></p>
</blockquote>

<p><strong>Step 3:</strong> Inspect the active Serve configuration.</p>

<div class="language-bash highlighter-rouge"><div class="highlight"><pre class="highlight"><code>tailscale serve status
</code></pre></div></div>

<blockquote>
  <p>The status should show HTTPS traffic being proxied to <code class="language-plaintext highlighter-rouge">http://127.0.0.1:8080</code>.</p>
</blockquote>

<p>Open the displayed <code class="language-plaintext highlighter-rouge">https://&lt;machine-name&gt;.&lt;tailnet-name&gt;.ts.net</code> address from another Tailscale device. The dashboard should load over HTTPS without exposing port <code class="language-plaintext highlighter-rouge">8080</code> to the local network or public internet. <a href="https://tailscale.com/docs/features/tailscale-serve">tailscale</a></p>

<h1 id="management-commands">Management commands</h1>

<table>
  <thead>
    <tr>
      <th>Task</th>
      <th>Command</th>
    </tr>
  </thead>
  <tbody>
    <tr>
      <td>Start Glance</td>
      <td><code class="language-plaintext highlighter-rouge">podman compose up -d</code></td>
    </tr>
    <tr>
      <td>Stop Glance</td>
      <td><code class="language-plaintext highlighter-rouge">podman compose down</code></td>
    </tr>
    <tr>
      <td>Restart after config edits</td>
      <td><code class="language-plaintext highlighter-rouge">podman compose restart glance</code></td>
    </tr>
    <tr>
      <td>Follow logs</td>
      <td><code class="language-plaintext highlighter-rouge">podman logs -f glance</code></td>
    </tr>
    <tr>
      <td>Check container state</td>
      <td><code class="language-plaintext highlighter-rouge">podman ps --filter name=glance</code></td>
    </tr>
    <tr>
      <td>Check Tailscale proxy</td>
      <td><code class="language-plaintext highlighter-rouge">tailscale serve status</code></td>
    </tr>
    <tr>
      <td>Disable Tailscale Serve</td>
      <td><code class="language-plaintext highlighter-rouge">sudo tailscale serve off</code></td>
    </tr>
  </tbody>
</table>

<h1 id="notes">Notes</h1>

<ul>
  <li>Keep the host binding as <code class="language-plaintext highlighter-rouge">127.0.0.1:8080:8080</code>; changing it to <code class="language-plaintext highlighter-rouge">8080:8080</code> makes Glance reachable directly on every network interface.</li>
  <li>If SELinux blocks the bind mount on Fedora, ensure the volume ends in <code class="language-plaintext highlighter-rouge">:Z</code>; this was the missing piece when a container could start but could not read its mounted config.</li>
  <li><code class="language-plaintext highlighter-rouge">tailscale serve</code> is tailnet-only. Do not use <code class="language-plaintext highlighter-rouge">tailscale funnel</code> unless the goal is deliberate public exposure; Funnel is the internet-facing counterpart. <a href="https://tailscale.com/blog/reintroducing-serve-funnel">tailscale</a></li>
  <li>Feed availability is outside the container’s control. If one widget is empty, test its RSS URL directly before assuming Glance is broken.</li>
</ul>

<p>That is enough dashboard infrastructure for one afternoon.</p>]]></content><author><name>Roberto Chang-Silva</name><email>rjavierch@seoultech.ac.kr</email><uri>https://air.seoultech.ac.kr/index.do</uri></author><category term="homelab-systems" /><category term="podman" /><category term="homelab" /><category term="tailscale" /><category term="self-hosted" /><summary type="html"><![CDATA[I wanted a lightweight, self-hosted dashboard for news, research, and YouTube feeds without the bloat. Glance fits the bill, deployed on a spare Raspberry Pi.]]></summary></entry><entry><title type="html">KDE Plasma: Manual Screen Off Button</title><link href="https://roberto-chang-silva.github.io/posts/kde-plasma-manual-screen-off/" rel="alternate" type="text/html" title="KDE Plasma: Manual Screen Off Button" /><published>2026-08-17T00:00:00+00:00</published><updated>2026-08-17T00:00:00+00:00</updated><id>https://roberto-chang-silva.github.io/posts/kde-plasma-manual-screen-off</id><content type="html" xml:base="https://roberto-chang-silva.github.io/posts/kde-plasma-manual-screen-off/"><![CDATA[<p>The other day (could be months, week, days ago) I was running some commands in my laptop and was unable to turn off the screen on demand so I can leave it unattended without burning the pixels of my screen. So this is a quick guide to create a dedicated menu item that instantly powers off the monitor (putting it into standby) while keeping background tasks running.</p>

<h1 id="the-screen-off-command">The Screen Off Command</h1>

<p>KDE uses <code class="language-plaintext highlighter-rouge">kscreen-doctor</code> to control display power states safely on both Wayland and X11:</p>

<div class="language-bash highlighter-rouge"><div class="highlight"><pre class="highlight"><code>kscreen-doctor <span class="nt">--dpms</span> off
</code></pre></div></div>

<p>This command tells the display server to turn off the monitor’s signal without suspending the system, locking the session, or interrupting any running processes.</p>

<h1 id="create-a-custom-application-launcher">Create a Custom Application Launcher</h1>

<ol>
  <li>Open the <code class="language-plaintext highlighter-rouge">KDE Menu Editor</code></li>
  <li>Create a new item.</li>
  <li>Set the <strong>Name</strong> field to something like <code class="language-plaintext highlighter-rouge">Turn off screen</code>.</li>
  <li>Set the <strong>Command</strong> field to:
    <div class="language-bash highlighter-rouge"><div class="highlight"><pre class="highlight"><code>kscreen-doctor <span class="nt">--dpms</span> off
</code></pre></div>    </div>
  </li>
  <li>Assign an icon (a monitor/display icon) for quick visual recognition. Merely optional.</li>
  <li>Save the entry.</li>
</ol>]]></content><author><name>Roberto Chang-Silva</name><email>rjavierch@seoultech.ac.kr</email><uri>https://air.seoultech.ac.kr/index.do</uri></author><category term="notes-snippets" /><category term="linux-desktop" /><category term="kde" /><summary type="html"><![CDATA[I needed to power off my laptop screen on demand without pausing background tasks. Here's a quick guide to a menu item that puts the display straight to standby.]]></summary></entry><entry><title type="html">Filtering clipboard data before pasting into LLMs</title><link href="https://roberto-chang-silva.github.io/posts/clipboard-privacy-filter/" rel="alternate" type="text/html" title="Filtering clipboard data before pasting into LLMs" /><published>2026-08-16T00:00:00+00:00</published><updated>2026-08-16T00:00:00+00:00</updated><id>https://roberto-chang-silva.github.io/posts/clipboard-privacy-filter</id><content type="html" xml:base="https://roberto-chang-silva.github.io/posts/clipboard-privacy-filter/"><![CDATA[<p>This is a way I found to “filter” your clipboard right before pasting it into an LLM chatbot (ChatGPT, Mistral, Gemini, etc.). Specifically for my case, I use KDE as a desktop environment, which happens to have an option to invoke actions on a clipboard element. I thought, why not create a filter to remove names, numbers, hostnames, IPs, usernames, emails, and other personal details, so the AI can still help me with my inquiries.</p>

<h1 id="how-to-do-it">How to do it?</h1>

<h2 id="creating-the-sed-rules-file">Creating the <code class="language-plaintext highlighter-rouge">sed</code> rules file</h2>

<p>Create the file that will contain the replacement regular expressions:</p>

<div class="language-bash highlighter-rouge"><div class="highlight"><pre class="highlight"><code><span class="nb">touch</span> ~/.privacy_action.sed
nano ~/.privacy_action.sed
</code></pre></div></div>

<p>Paste the following content (<code class="language-plaintext highlighter-rouge">sed</code> basic syntax, control characters escaped with <code class="language-plaintext highlighter-rouge">\</code>):</p>

<div class="language-bash highlighter-rouge"><div class="highlight"><pre class="highlight"><code><span class="c"># --- EMAILS ---</span>
s/[a-zA-Z0-9._%+-]<span class="se">\+</span>@[a-zA-Z0-9.-]<span class="se">\+\.</span><span class="o">[</span>a-zA-Z]<span class="se">\{</span>2,<span class="se">\}</span>/EMAIL_REDACTED/gI

<span class="c"># --- ORCID (dash-numeric, must be locked in before phone regex runs) ---</span>
s/<span class="se">\b</span><span class="o">[</span>0-9]<span class="se">\{</span>4<span class="se">\}</span>-[0-9]<span class="se">\{</span>4<span class="se">\}</span>-[0-9]<span class="se">\{</span>4<span class="se">\}</span>-[0-9]<span class="se">\{</span>3<span class="se">\}</span><span class="o">[</span>0-9X]<span class="se">\b</span>/ORCID_REDACTED/g

<span class="c"># --- TAILSCALE IPs (dotted-numeric, must be locked in before phone regex runs) ---</span>
s/<span class="se">\b</span>100<span class="se">\.\(</span>6[4-9]<span class="se">\|</span><span class="o">[</span>7-9][0-9]<span class="se">\|</span>1[01][0-9]<span class="se">\|</span>12[0-7]<span class="se">\)\.</span><span class="o">[</span>0-9]<span class="se">\{</span>1,3<span class="se">\}\.</span><span class="o">[</span>0-9]<span class="se">\{</span>1,3<span class="se">\}\b</span>/TAILSCALE_IP_REDACTED/g

<span class="c"># --- GENERIC IPv4 ---</span>
s/<span class="se">\b\(</span><span class="o">[</span>0-9]<span class="se">\{</span>1,3<span class="se">\}\.\)\{</span>3<span class="se">\}</span><span class="o">[</span>0-9]<span class="se">\{</span>1,3<span class="se">\}\b</span>/IP_REDACTED/g

<span class="c"># --- MAC ADDRESSES ---</span>
s/<span class="se">\b\(</span><span class="o">[</span>0-9a-f]<span class="se">\{</span>2<span class="se">\}</span><span class="o">[</span>:-]<span class="se">\)\{</span>5<span class="se">\}</span><span class="o">[</span>0-9a-f]<span class="se">\{</span>2<span class="se">\}\b</span>/MAC_REDACTED/gI

<span class="c"># --- IPv6 ---</span>
s/<span class="se">\b\(</span><span class="o">[</span>0-9a-f]<span class="se">\{</span>1,4<span class="se">\}</span>:<span class="se">\)\{</span>3,7<span class="se">\}</span><span class="o">[</span>0-9a-f]<span class="se">\{</span>1,4<span class="se">\}\b</span>/IPV6_REDACTED/gI
s/<span class="se">\b\(</span><span class="o">[</span>0-9a-f]<span class="se">\{</span>1,4<span class="se">\}</span>:<span class="se">\)\{</span>1,7<span class="se">\}</span>:<span class="se">\(</span><span class="o">[</span>0-9a-f]<span class="se">\{</span>1,4<span class="se">\}</span>:<span class="se">\)</span><span class="k">*</span><span class="o">[</span>0-9a-f]<span class="se">\{</span>0,4<span class="se">\}\b</span>/IPV6_REDACTED/gI
s/::<span class="se">\(</span><span class="o">[</span>0-9a-f]<span class="se">\{</span>1,4<span class="se">\}</span>:<span class="se">\)\{</span>1,7<span class="se">\}</span><span class="o">[</span>0-9a-f]<span class="se">\{</span>1,4<span class="se">\}\b</span>/IPV6_REDACTED/gI
s/<span class="se">\(</span>^<span class="se">\|</span> <span class="se">\)</span>::1<span class="se">\b</span>/<span class="se">\1</span>IPV6_REDACTED/g

<span class="c"># --- TAILSCALE DOMAINS ---</span>
s/<span class="se">\b</span><span class="o">[</span>a-zA-Z0-9_-]<span class="se">\+\.\(</span>ts<span class="se">\|</span>tailscale<span class="se">\)\.</span>net<span class="se">\b</span>/TAILSCALE_REDACTED/gI

<span class="c"># --- SOCIAL MEDIA / GITHUB ---</span>
s/@[a-zA-Z0-9_]<span class="se">\{</span>3,<span class="se">\}</span>/@USER_REDACTED/g
s|github<span class="se">\.</span>com/[a-zA-Z0-9_-]<span class="se">\+</span>|github.com/USER_REDACTED|gI

<span class="c"># --- USERS AND HOSTNAMES ---</span>
s/<span class="se">\b\(</span>my-username<span class="se">\|</span>root<span class="se">\|</span>admin<span class="se">\)\b</span>/USER_REDACTED/gI
s|/home/[a-zA-Z0-9_-]<span class="se">\+</span>|/home/USER_REDACTED|g
s|/var/home/[a-zA-Z0-9_-]<span class="se">\+</span>|/var/home/USER_REDACTED|g
s/<span class="se">\b\(</span>fedora-bazzite<span class="se">\|</span>mi-laptop<span class="se">\|</span>router-openwrt<span class="se">\)\b</span>/HOST_REDACTED/gI
s/<span class="se">\b</span><span class="o">[</span>a-zA-Z0-9_-]<span class="se">\+</span>@[a-zA-Z0-9_-]<span class="se">\+\b</span>/USER@HOST_REDACTED/g

<span class="c"># --- PERSONAL NAMES ---</span>
s/<span class="se">\b\(</span>Stephen<span class="se">\|</span>Rykard<span class="se">\|</span>Cole<span class="se">\|</span>Kleene<span class="se">\)\(</span><span class="o">[</span> -]<span class="se">\(</span>Stephen<span class="se">\|</span>Rykard<span class="se">\|</span>Cole<span class="se">\|</span>Kleene<span class="se">\)\)\+\b</span>/FULL_NAME/gI
s/<span class="se">\b\(</span>Stephen<span class="se">\|</span>Rykard<span class="se">\|</span>Cole<span class="se">\|</span>Kleene<span class="se">\)\b</span>/NAME_REDACTED/gI
</code></pre></div></div>

<p>Here you I just need to update accordingly with my personal information.</p>

<h2 id="configuration-in-kde">Configuration in KDE</h2>

<ol>
  <li>Right-click the clipboard icon in the system tray and select <strong>Configure Clipboard…</strong></li>
  <li>Go to the <strong>Actions Configuration</strong> tab.</li>
  <li>Add a new action with the following parameters:</li>
</ol>

<table>
  <thead>
    <tr>
      <th style="text-align: left">Parameter</th>
      <th style="text-align: left">Value to enter</th>
    </tr>
  </thead>
  <tbody>
    <tr>
      <td style="text-align: left"><strong>Regular expression (Match Pattern)</strong></td>
      <td style="text-align: left"><code class="language-plaintext highlighter-rouge">.{4,}</code> <em>(Applies to any text of 4 characters or more)</em></td>
    </tr>
    <tr>
      <td style="text-align: left"><strong>Description</strong></td>
      <td style="text-align: left"><code class="language-plaintext highlighter-rouge">Automatic Privacy Filter</code></td>
    </tr>
    <tr>
      <td style="text-align: left"><strong>Command</strong></td>
      <td style="text-align: left"><code class="language-plaintext highlighter-rouge">echo -n "%s" \| sed -f ~/.privacy_action.sed</code></td>
    </tr>
    <tr>
      <td style="text-align: left"><strong>Output</strong></td>
      <td style="text-align: left"><code class="language-plaintext highlighter-rouge">Replace clipboard</code> or <code class="language-plaintext highlighter-rouge">Ignore</code> (according to your preference)</td>
    </tr>
  </tbody>
</table>

<h1 id="testing-and-verification">Testing and Verification</h1>

<p>To verify that the script works, you can test the output with the clipboard icon in the system tray, copy your text, clic and select <code class="language-plaintext highlighter-rouge">Invoke action</code> :</p>

<p><strong>Clipboard content:</strong></p>
<div class="language-plaintext highlighter-rouge"><div class="highlight"><pre class="highlight"><code>Hi, I'm Stephen Rykard Cole Kleene, my ORCID is 0000-0000-0000-0000.
Email me at stephen.kleene@example.com.

My GitHub is github.com/stephenkleene and on Twitter I'm @kleene_dev.

SSH into my box: root@fedora-bazzite, home dir is /home/my-username.
Router is at 192.168.1.1, my Tailscale node is 100.200.300.400 
and reachable at mi-pc.tailscale.net.

MAC address of the NIC: 00:1a:2b:3c:4d:5e
IPv6 local: fe80::a1b2:3c4d:5e6f, loopback is ::1
</code></pre></div></div>

<p><strong>Expected output:</strong></p>
<blockquote>
  <p>Hi, I’m FULL_NAME, my ORCID is ORCID_REDACTED.
Email me at EMAIL_REDACTED.</p>

  <p>My GitHub is github.com/USER_REDACTED and on Twitter I’m @USER_REDACTED.</p>

  <p>SSH into my box: USER@HOST_REDACTED, home dir is /home/USER_REDACTED.
Router is at IP_REDACTED, my Tailscale node is TAILSCALE_IP_REDACTED 
and reachable at TAILSCALE_REDACTED.</p>

  <p>MAC address of the NIC: MAC_REDACTED
IPv6 local: IPV6_REDACTED, loopback is IPV6_REDACTED</p>
</blockquote>]]></content><author><name>Roberto Chang-Silva</name><email>rjavierch@seoultech.ac.kr</email><uri>https://air.seoultech.ac.kr/index.do</uri></author><category term="workflows-code" /><category term="privacy" /><category term="llm" /><category term="kde" /><summary type="html"><![CDATA[A way to "filter" your clipboard before pasting into an LLM chatbot, using KDE's clipboard actions to strip names, IPs, emails, and other details.]]></summary></entry><entry><title type="html">Enabling Firefox’s containers</title><link href="https://roberto-chang-silva.github.io/posts/enable-containers-firefox-librewolf-flatpak/" rel="alternate" type="text/html" title="Enabling Firefox’s containers" /><published>2026-08-16T00:00:00+00:00</published><updated>2026-08-16T00:00:00+00:00</updated><id>https://roberto-chang-silva.github.io/posts/enable-containers-firefox-librewolf-flatpak</id><content type="html" xml:base="https://roberto-chang-silva.github.io/posts/enable-containers-firefox-librewolf-flatpak/"><![CDATA[<p>For some reason, in my Firefox’s installations of my Linux machines the containers function is just not enabled and can’t find it in the settings. This includes Librewolf browser as well. It its very simple to activate.</p>

<p><strong>Step 1:</strong> In the browser’s address bar type <code class="language-plaintext highlighter-rouge">about:config</code> and hit “Accept the risk”.</p>

<p><strong>Step 2:</strong> In the search bar located on top of the site search for <code class="language-plaintext highlighter-rouge">privacy.userContext.enabled</code> and double click it to set it to <code class="language-plaintext highlighter-rouge">true</code></p>

<p>That’s it! enjoy Firefox’s containers.</p>]]></content><author><name>Roberto Chang-Silva</name><email>rjavierch@seoultech.ac.kr</email><uri>https://air.seoultech.ac.kr/index.do</uri></author><category term="notes-snippets" /><category term="librewolf" /><category term="firefox" /><summary type="html"><![CDATA[For some reason, in my Firefox's installations of my Linux machines the containers function is just not enabled and can't find it in the settings. This includes Librewolf browser as well. It its very simple to activate.]]></summary></entry></feed>